Tools for Administrators
eCode360 offers a suite of administrative tools for managing your Code. These tools allow you to manage users, configure site specific settings, see eCode usage, view the number of official copies of the Code book in circulation, the Code update schedule, and job.
While this section gives you the basics on eCode360's administrative (admin) tools, it's recommended that you take part in our webinar series for more specific information and guidance. For a list of our webinars and how to register, click here.
To access the eCode administrative tools, click on the Admin button. You will need to be logged in to your eCode first.
To access the eCode administrative tools, click on the Admin button. You will need to be logged in to your eCode first.
Manage Users
There are three types of eCode360 users:
The table below shows which permissions are granted to each type of user. Please note that you don't have to log in to view your eCode, but logged-in users do gain access to additional tools.
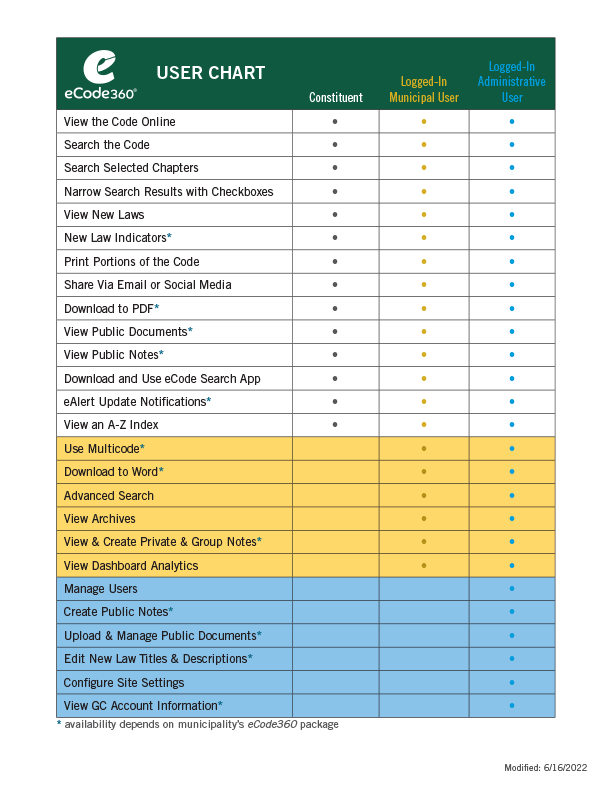
- Citizens: users who do not login and are able to read, search and print the Code.
- Municipal Users: typically municipal officials who would need to download portions of the Code to Word, perform Code research
- Administrative Users: typically the municipal officials who are responsible for keeping the Code up to date.
The table below shows which permissions are granted to each type of user. Please note that you don't have to log in to view your eCode, but logged-in users do gain access to additional tools.
Adding and Managing Users
Administrative users can add and remove users. They can assist others with passwords. eCode allows for an unlimited number of free user accounts. The Code is read-only. There is no way for a user to change the Code. 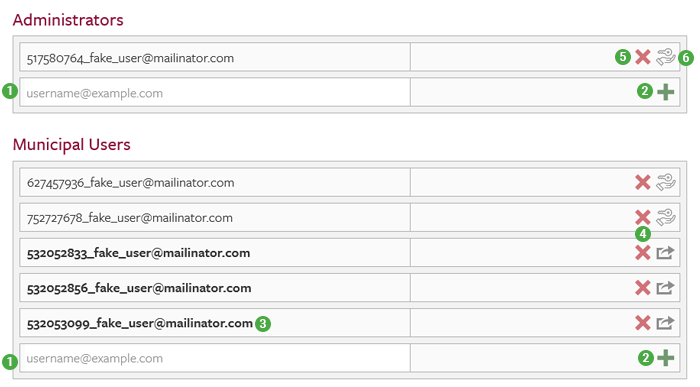
- Type the email address of the person you would like to add.
- Hit enter, or click the green plus (+) to the right.
- The person you have added will receive an email with instructions on activating their account and creating a password.
- Until invited persons activate their account, their email address will appear in the list in bold with an arrow icon. If they did not receive their email or need it to be resent, click the arrow icon to send a new invitation email.
- Click the red X to remove a user.
- User tip: You can remove a "Municipal User" and then add them as an "Admin User" to change their permissions.
- Click the Assign New Password icon to reset a users password for them
The Dashboard
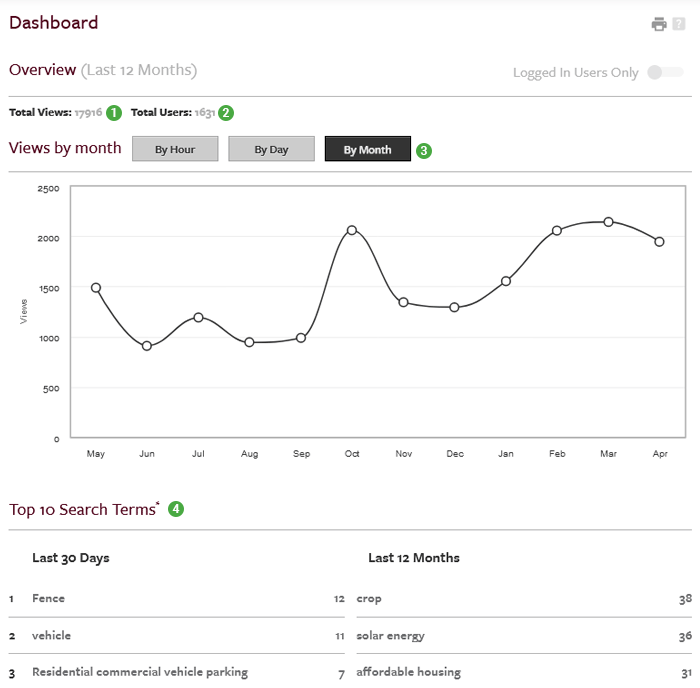
eCode360 offers an excellent Dashboard feature that graphically displays user data related to your eCode. The Dashboard allows you to see:- Total Views: Shows the total number of times people have visited your eCode. Use this data to show the value of an online Code to Municipal Staff or board members.
- Total Users: Shows the total number of users that have visited your eCode. If a citizen accesses your eCode from the same computer multiple times, he or she is only counted as one user.
- Views by: A graph of the number of views over time shows you when people access your Code the most.
- Top 10 Search Terms: Find out what topics people want to know about in your Code!
Account Management
You can also view information related to managing your General Code account including:- Titles: View a list of your Code volumes and their supplement schedules.
- Title Distribution: View a list of all of the paper copies of your Code and who they've been distributed to (if this information was supplied to General Code).
- Job History: See when jobs were received and their current status (Open or Completed).
- User Tip: Can be used for reference when distributing supplements.
Site Settings
The Site Settings page allows you to manage the look and functionality of your eCode360 site.
Color Customization
The Color Customization section allows you to update the colors used in your eCode360 site, creating a visual experience that matches your own website. The following colors can be modified:- Banner Background: the color along the top of the code page as well as the Home page
- Accent Color: the color used throughout the Code as an accent
- Title Color: The color to the top-level headings within the Code
- Click the color rectangle next to the entry you want edit.
- Pick the color using the color selector. To achieve an exact match with your website, enter in the matching "Hex" value. If you do not know the hex value to use, please consult with your municipality's website administrator.
- Click the "Apply Color Changes" button
Banner Customization
To add a custom banner to the top of your Home page, check the box next to "Use custom banner". This will give you the option to upload a banner image file for your site. The banner image must meet the following specifications:- 940 pixels wide by 106 high
- RGB or LAB color space preferred
- Accepted formats: JPEG, PNG, GIF
When you are satisfied with the banner image file and website link setting, click the "Apply Banner Changes" button.
Removing Customizations
To reset the Color Customization and Banner setting to the eCode360 default, do the following:- Navigate to the Site Settings Page
- In the Color Customization section, click "Change Colors to Default" then "Apply Color Changes"
- In the Banner Customization section, uncheck the "Use custom banner" option and then click "Apply Banner Changes"
New Law Customization
Managing New Law Settings
Control New Laws Visibility
Admin users can make New Laws invisible to public users that have not logged in to eCode.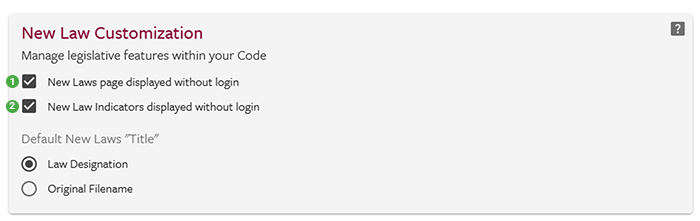
- Uncheck "New Laws page displayed without login" to hide the New Laws from public users.
- Uncheck "New Law Indicators displayed without login" to hide New Law Indicators from public users.
Change Default New Laws Titles
The title of a New Law is the ordinance or local law number. Admin users can customize default titles of all New Laws to be the original file names. Enabling this setting means that the title of each new law will be the same as the name of the file that was sent to General Code.
Enabled Features
The following features can be enabled or disabled within your Code:- Group Notes - when this feature is disabled, Notes that are created or modified in the site can only be set as "Private" or "Public". See the "Add Notes and Custom Links" help section for more information.
- Public Notes - when this feature is disabled, no one can create a note and share it for public viewing.
- Index Page - when this feature is disabled, users will rely on the search bar to find the information they are looking for.
- Translate - when this feature is enabled, users of the Code have the option to view the text of the Code in another language. This translation is provided by Google® Translate and is unofficial as described in the Terms of Use.
- Hide Created/Updated by Dates for PubDocs - when this feature is enabled users will not see the date the documents are uploaded or modified.
Home Page
This is the section where your home page customization takes place. The Home page is where you users can be directed to contact information, quick links to popular resources,
Public Notes
Admin users can easily create public notes to guide constituents to comments or supplementary material. A note can contain a link to outside information, another part of your Code, or even a form on your municipal website. For example, if you are writing a note about transportation, you could add a link that takes the user directly to the DMV website. Public notes are visible to everyone who accesses your code. Only Admin users can create notes viewable to the public. Instructions on how to create a note can be found here.
Public Documents (PubDocs)
Only Admin users can manage Public Documents. Instructions on how to manage PubDocs can be found here.