Tools for Municipal Users
Logging In
If you work for a municipality with a Code hosted on the eCode360 platform, you can request a login to unlock additional tools and functionality. You can request your eCode360 login here. If you have questions about how to log in please view the video below.Once you've logged in to eCode360, you can use any of the user tools described below. Click here to view a full list of eCode360 tools that are available to each type of user.
Multicode Search
This tool gives you the ability to search for a topic across multiple Codes in eCode360, allowing you to see how different municipalities handle similar issues and giving you samples of legislation that you may incorporate into your own Code amendments. Watch two short videos to get an overview of the Multicode feature here and here.How to use the Multicode tool
Click on the Multicode button on the Menu Bar to open the Code Finder screen.
Using the Code Finder, you will narrow down the Codes to search through, add them to the search list and enter the term that you are researching.
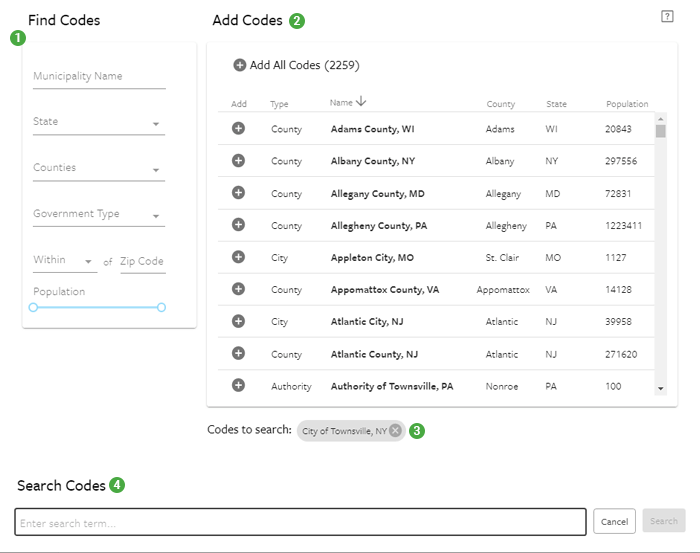
- Find Codes: Enter the name of a municipality to find that Code, or enter information in the criteria fields to narrow the list of available Codes by County, Zip, State, etc.
- Add Codes: Add individual Codes by clicking the + next to their name in the list; add all Codes by clicking the + next to Add All Codes (matching your criteria).
- Code to Search: Inspect this list to ensure that the Codes or criteria listed are what you want to search. You can add as many individual Codes or criteria as you like. You can also remove Codes for the "Codes to Search" list by using the "(X)" at the end of each chip.
- Search Codes: Type the search term and click the Search button.
eCode360 will display a search results page.
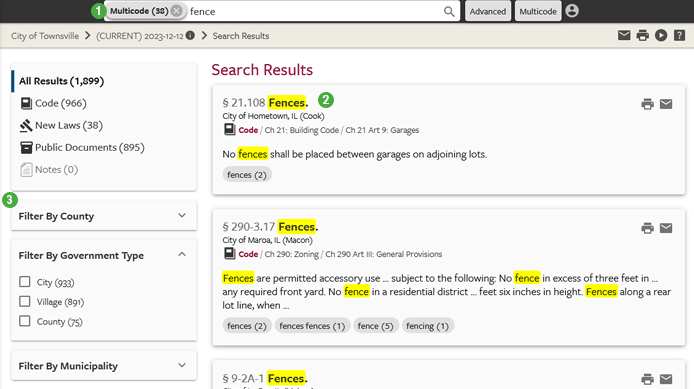
- Multicode: This chip will return you to the Multicode dialog box where you can perform a new search; or add/remove Codes to search.
- Search Results: A list of where the results are from with hyperlinks to get to those results.
- Filters: Narrow down your search results selecting just the types of results that you want to see.
Add Notes and Custom Links
As a logged-in user, it is easy to add a note to the Code at a particular section that is of interest to you. In addition to the text you type, a note can contain a link to external information, another part of your Code, or even a form on your own municipal website.There are three kinds of Notes you can create:
- Private Notes are visible only to you. All your Private Notes can be viewed later in a single list, like bookmarks.
- Group Notes are visible to you and other Municipal and Administrative users of your eCode.
- Public Notes are visible to everyone who accesses the Code (even your constituents) but can only be created by Administrative users. These notes are great for providing constituents with information or links to frequently requested sites. For more information on creating Public Notes, click here.
Add a Note to a selected Code section:
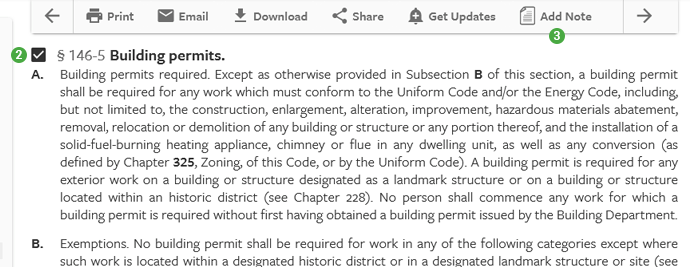
- Navigate to the location in the Code where you would like to add a note.
- Click a the checkbox next to that portion of the code.
- Click "Add Note" in the toolbar
Note Editor:
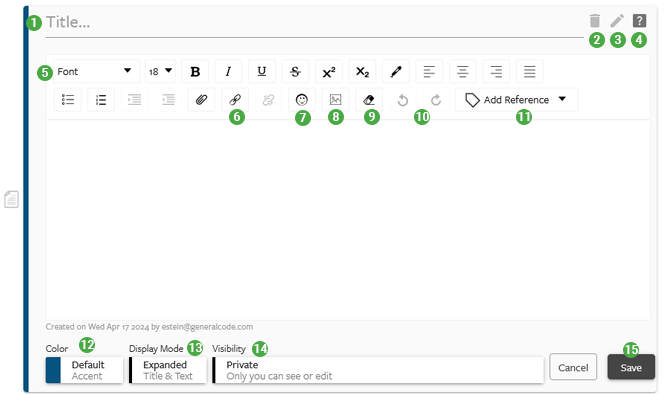
- Title: Provide a title for the note.
- Delete: Remove a note that was previously added.
- Edit: Make changes to a note that was previously added.
- Help: Open the section of eCode360 help that covers notes.
- Font Options: Change the font, text size, or add text decoration using the options in this section of the toolbar.
- Insert a link
- Insert an emoji
- Upload a picture
- Remove the formatting from the currently selected text
- Undo / Redo
- Add Reference: Insert a reference to another part of the Code
- Set the note accent color
- Set the display mode for the note. Expanded shows the full note content. Minimized shows the title only (Users can click the note icon to expand the note when needed).
- Set the visibility for the note. The default visibility is always Private.
- Click Save to publish the note.
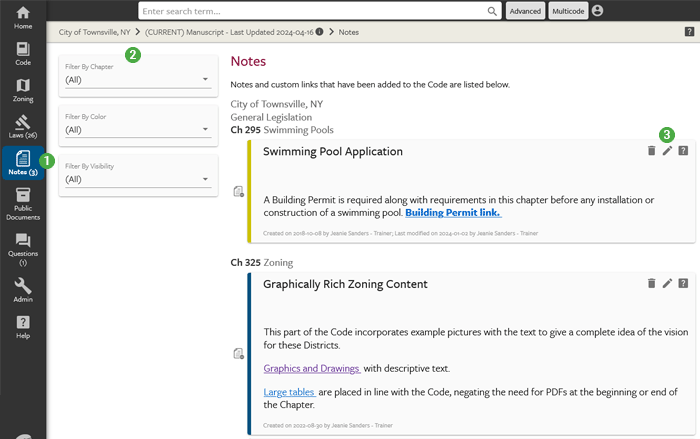
- To manage your notes, click the "Notes" option in the left navigation area. This will open a list of all the notes you've added, sorted in the order they appear in the current Code.
- Notes can be filtered on the notes listing page by Chapter, Color and Visibility.
- Logged-in users can edit or delete notes from the Notes listing page
Download to Microsoft Word
Logged-in users can download code content to a Word document to aid in the drafting of amendments to the code.To Download to a Word Document:
- Select the section(s) or chapter(s) you wish to download.
- Click the Download icon in the toolbar.
- Click Word
View Online Code Archives
A permanent archive of previous Code versions is available to logged-in users. Archived Code versions are available back to 2011, or to the date your code was first added online in eCode360 — whichever is later.To access a previous Code version from the Online Code Archives, do the following:

- Login to your Code
- Select the dropdown arrow in the breadcrumb trail next to the Current version of the Code.
- Select the previous version of Code to view it

- User Tip: You can use eCode360 tools on your archived Code, including Search, Email a Link, Print, and Download.
Compare Sections of the Code
eCode360’s Code Compare feature lets you see how a specific section of your municipal code has changed over time. Select any two available code sections to compare where information has been added or deleted from the previous version. It’s an easy way to track legislative changes, support legal reviews, and respond to public inquiries with confidence.Selecting a Section to Compare
Code Compare works at the individual section level in eCode360 and is not available for chapter, article, or title-level items. To start a comparison:
- Login to your code
- Navigate to a section you wish to compare
- Click the checkbox to select a chapter.
- Click the Compare icon that appears in the toolbar. A History page appears for the selected section, showing earlier and newer codified versions of the section.
User Tip: You can start a comparison from either the current version of the code or from any archived version. The Compare option is available in both views. Only sections that have previous versions available can use the comparison feature.

Using the Compare Versions Dialog
The History page for a selected section provides several options to view changes made. You can:
- View this version: Opens to the specific version of the selected section.
- Compare with previous version: See how the selected section differs from the previous version of the same section.
- Compare with current version: See where the selected section differs from the current version of the same section.
- Earliest available version: The oldest version on record is labeled “Earliest available version.” This indicates the first version eCode360 has on file for this section, not necessarily the original date of enactment.

Reviewing the Comparison
The comparison view displays the differences between your two selected versions in a single, unified view.
Understanding the Highlights
Changes appear within the text:- Additions are shown underlined in green. These are words or passages added in the later version.
- Deletions are shown with a strikethrough in red. These are words or passages removed from the previous version.
A legend appears with the comparison results and explains what each visual indicator represents. The legend includes the total count of additions and deletions between the two selected versions at a glance.
User Tip: If a version shows no additions or deletions, it means no changes to the text of that section occurred in that update. Attachment-only changes are not reflected in comparison counts. Also, the highlighted differences reflect changes to the code text as maintained in eCode360 and may not match the exact language of the original ordinance or resolution that made the change.
Viewing a Version in Full
From the comparison view, you can open either version to read the complete text:- View Current Code: Opens the current published version of the section.
- View Compared Version: Opens the archived version you selected as the Before version.
- Only versions visible on the Archive page are available for comparison. Hidden or collapsed versions are not included.
- If a version’s attachment is not available, the message “This file is not available for this version” will appear. Any available text differences will still be shown.
- If a section has no meaningful text changes between versions, the Compare and View links for those versions will not be displayed.
Manage User Settings
Logged-in users can manage their User Information, Password, eAlert subscriptions, and Private Notes on their User Settings page.
- Click the circle at the end of the Search bar
- Select User Settings
- Scroll down the page to manage or change the information.
The Dashboard
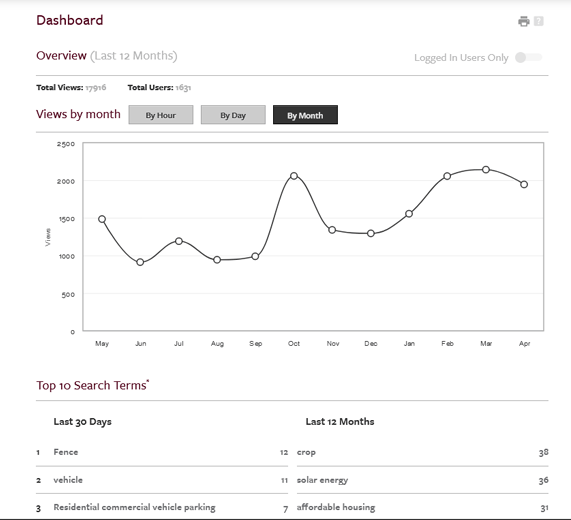
- To access the eCode dashboard, click Admin in the left navigation pane. You will need to be logged in to your eCode first.
- Hover over each month to see the how often your Code is accessed.
- Top 10 Search Terms: Find out what topics people want to know about in your Code!